Driver installation
11 Jan 2019 Kazuyuki Takeda
Here, let us take a look at how to setup the computer, regarding:
- Device driver
- software
We assume you already have an operational Opencore NMR hardware. We also assume that the eprom on the USB board has already been configured. For eprom configuration see the link.
Driver installation
The way that the driver is to be installed depends on the operating system (Linux, Mac, Windows).
Linux
Download a D2XX driver from FTDI, extract the downloaded file, and follow the instruction written in ReadMe.txt. That is:
- Copy the libraries to /usr/local/lib:
sudo cp libftd2xx.* /usr/local/lib - Give non-root access to the shared object:
sudo chmod 0755 /usr/local/lib/libftd2xx.so.1.4.8 - Create a symbolic link:
sudo ln -sf /usr/local/lib/libftd2xx.so.1.4.8 /usr/local/lib/libftd2xx.so
To enable plug and play feature, follow what is written in USB Setup on Linux.
Mac
Download a D2XX driver from FTDI, extract the downloaded file, and follow the instruction written in ReadMe.rtf. That is, open a Terminal, and:
- Copy the dylib file to /usr/local/lib:
sudo cp Desktop/D2XX/libftd2xx.1.4.4.dylib /usr/local/lib/libftd2xx.1.4.4.dylib - Make a symbolic link:
sudo ln -sf /usr/local/lib/libftd2xx.1.4.4.dylib /usr/local/lib/libftd2xx.dylib
To disable the built-in driver, you may have to run
sudo kextunload -bundle com.apple.driver.AppleUSBFTDI
every time you re-connect the USB cable. Whenever this operation is necessary, the console software gives you a message to do so.
Windows
- If you plug in the USB cable, the operating system may automatically detect the hardware and install the right driver.
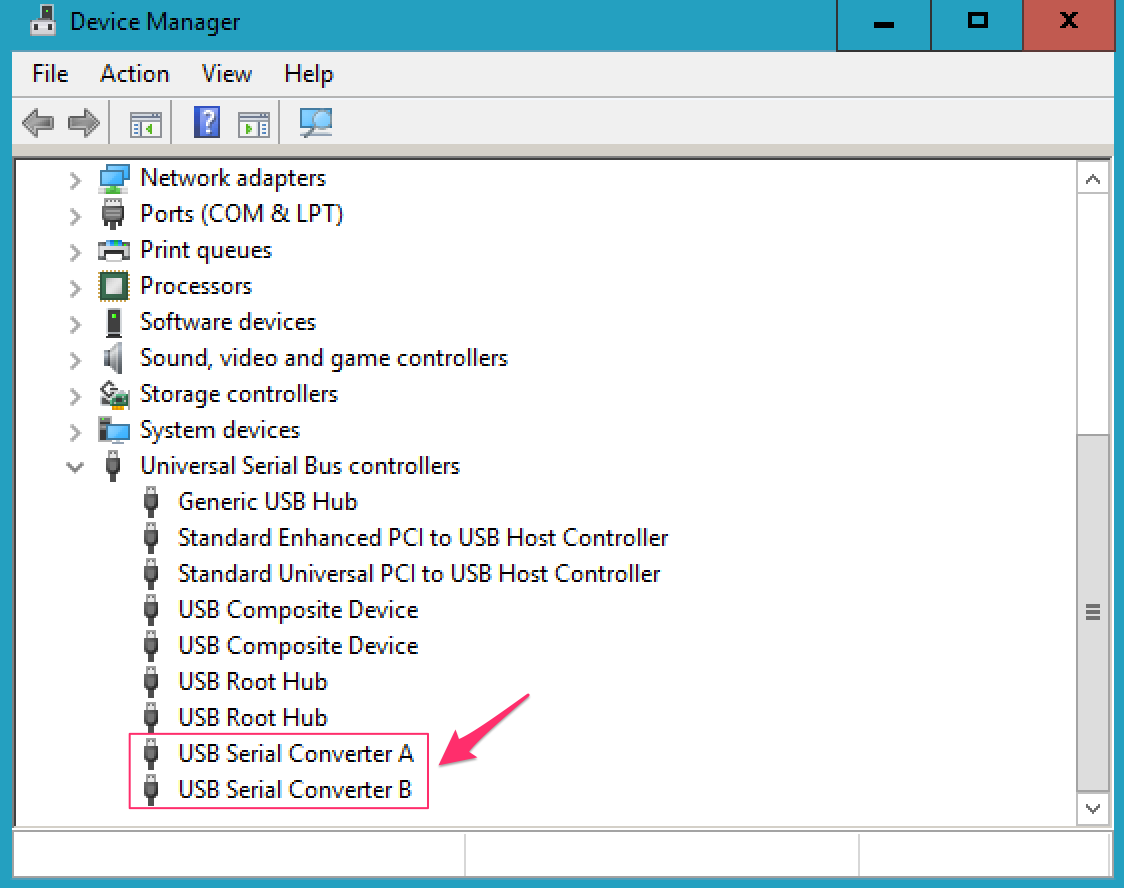
- To verify if the driver has successfully been installed, open device manager, and see the “Universal Serial Bus controllers”.
- It will be all right if both “USB Serial Converter A” and “USB Serial Converter B” are recognized.
- If there is something wrong with the driver, you can download a D2XX driver from FTDI.
Settings
Clone .opencorenmr to the home directory of your computer:
https://github.com/opencorenmr/.opencorenmr.git
As a result, you will have .opencorenmr directory under your home directory:
- Linux: ~/.opencorenmr, or /home/(username)/.opencorenmr
- Mac OSX: ~/.opencorenmr, or /Users/(username)/.opencorenmr
- Windows: C:\Users\(username)\.opencorenmr
.opnecorenmr directory contains:
gatesdirectory,examplesdirectory,
as well as *.ini files. In gates there are .gates file, which we call *gate definition files. Descriptions on the gate definiton files will be presented elsewhere.